| |
How
to Fold an
Origami
Goldfish
 This easy origami goldfish is our adaptation of one in Origami by Toyoaki Kawai. This easy origami goldfish is our adaptation of one in Origami by Toyoaki Kawai.
It's especially fun because of the way it
suddenly turns into a fish at the last step.
Spread the tail a bit and it can stand up on
its own.
Goldfish of different sizes can be strung
together in a mobile. >
 Since both sides of the paper show in this model, you can
have fun making origami goldfish of different colors. Since both sides of the paper show in this model, you can
have fun making origami goldfish of different colors.
< If you start with the colored side
down, as is usual with many models, the head of the fish will be
colored.
For another idea, see the jumbo, hand-painted origami goldfish in the Photo Gallery.
Materials
1 sheet of perfectly square paper
Click
to see cutting tips.
To make the mobile, we purchased:
- a package of extra-large paper: 13¾ inches (35cm), which we used for the big yellow fish. Available in our store.
- a pack of 10-size origami paper for the smaller fishes. The green fish is from a 3 1/8-inch (8cm) square. Available in our store.
|
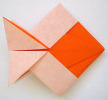
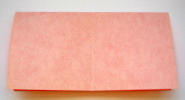
1. To have a colored tail, start
with the colored side of the paper up.
|
|
|
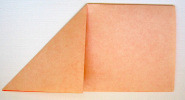
2. Fold in half.
|
|
|
3. Fold in half again.
4. Unfold.
|
|
|
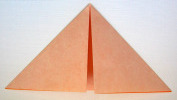
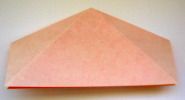
5.
Make sure the folded edge is away from you.
Using the center crease as a guide, fold down the corner.
|
|
|
6.
Repeat on the other side.
Next we're going to squash-fold both triangular flaps.
Glance ahead to Step 10 to see the result.
|
|
|
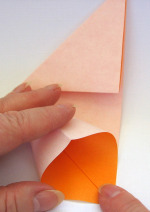
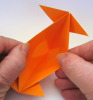
7. Lift
one of the triangular flaps.
|
|
|
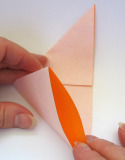
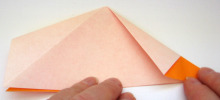
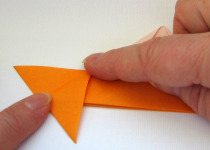
8.
Hold the point in place with one
hand while the other hand begins to squash the flap.
|
|
|
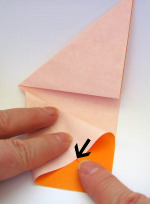
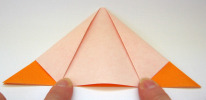
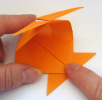
9.
As you squash it flat, line up
the crease line on the white part with the folded edge on the colored
part.
|
|
|
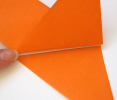
10. Repeat with the other flap. Back
|
|
|
11.
Turn the model over.
|
|
|
12.
Fold the side back on the
existing crease.
|
|
|
13.
Repeat on the other side.
|
|
|
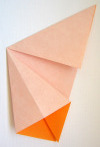
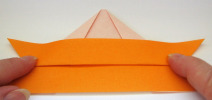
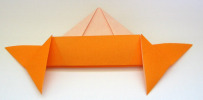
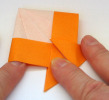
14.
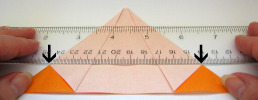
Fold up the lower edge.
The fold is
along a line connecting the two points indicated by the arrows in the
second photo.
Tip: If you
are working with a large piece of paper, using a straight edge to make a preliminary crease makes
this fold easier and neater.
|
|
|
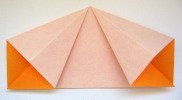
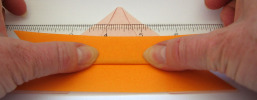
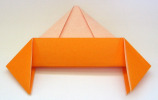
15.
Turn the model over.
|
|
|
16. Repeat the last fold.
|
|
|
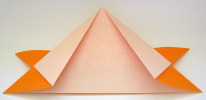
17.
Fold back one of the corners.
Make the fold even with the white part underneath.
We've spun it around here to show you.
|
|
|
18. Repeat on the other side.
|
|
|
19.
Turn the model over and repeat.
|
|
|
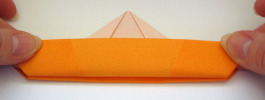
20.
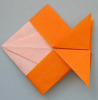
Pick it up and open the pocket.
As you pull it open, the tail pieces will begin to line up.
|

|
|
21.
Squash it down, bringing the two tail pieces together.
Nice work!
To cut a square hole in the fish, use something with a right angle, like a book or box, to mark the hole with pencil before you cut it.
Notice how we had to cut into the colored part of the yellow fish to make a hole big enough for the green fish.
Return the fish to Step 19 (just undo the last fold) and cut on your pencil mark.
Repeat on the other side of the fish, being careful to make the second hole identical to the first.
Remember the old adage: Measure twice, cut once!
You might find that the cutting releases pieces of the paper that you will then want to glue down.
|
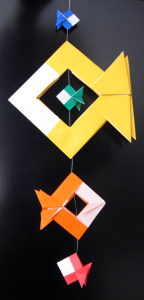
Notice how some of our fish are hanging a little tail-low? That's because the balance point is actually a bit towards the tail.
There's more paper in the tail, making it heavier than the nose.
With some experimentation, you can get your fish to hang perfectly
straight.
|
Back to top of Origami Goldfish
Browse
the
Origami Model Library
All About
Origami Home

|
