| |
How
to Make an
Origami
Easter Lily Plant
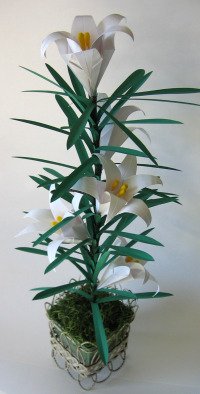 This dramatic origami Easter lily is easier than it looks and will last many seasons. This dramatic origami Easter lily is easier than it looks and will last many seasons.
Once you gather your materials and complete your first lily, the project will go quickly. See lily instructions >
We used regular computer paper and ear swabs for the flowers.
Of course, you could use any color paper you like and create an arrangement that's suitable for year-round display.
Materials
For each flower (our arrangement has 5 flowers):
- 2 sheets of regular white computer printer paper, cut into 8½-inch squares. See cutting
tips.
- Yellow paint. We used Dye-na-Flow Sun Yellow.
For the leaves:
- 2 sheets of 8½x11 green textured art paper or construction paper.
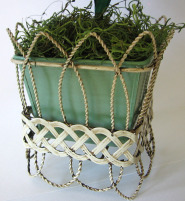
For the arrangement: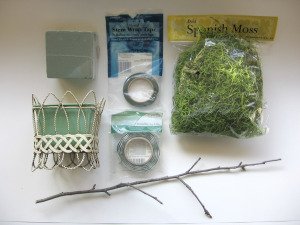
- Decorative container.
- Block of dry floral foam to fit the container.
- Green florist tape.
- Florist sticky clay, optional.
- A real or artificial stem with side branches to support the flowers, about 20 inches long.
- Spanish moss.
- Quick-dry adhesive
- Wooden clothespins come in handy for drying.
|
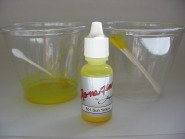
1. To make the yellow centers, put some paint in a cup and
dip the swab ends.
The paint we used required drying overnight.
| 
|
|
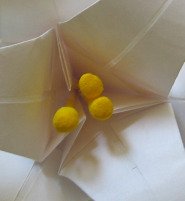
2. Make the lilies.
Once your lilies are folded and the swabs are dry, insert one into a lily to check the length.
We found cutting off the unpainted fuzzy tips gave us the length we liked.
Glue three into each flower.
|
|
|
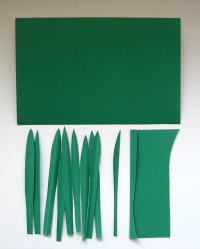
3. Make the lily leaves:
Cut
a piece of green 8½x11 paper in half.
For each leaf, fold in the short edge of the paper only about ¼ inch or less.
With the fold as the center of the leaf, cut a very slender leaf about 5 inches long.
This gives you a very symmetrical leaf with a realistic crease right down the middle.
Cut a whole bunch!
We used almost two full sheets of paper.
|
|
|
4.
Prepare the container by fitting the foam in it, and securing with sticky clay, if necessary.
Cover with moss. We used a couple of twigs to secure the moss. They're hidden in the moss.
Caution: Spanish moss is very messy! Work over newspaper, or a sink, or outdoors.
| 
|
|
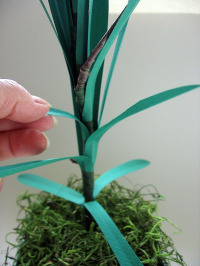
5. Starting at the top
of the stem, use the florist tape to attach the leaves. Leave
them lay against the stem for now, kind of like shingling a roof.
Cover the entire stem except the end that will be stuck in the foam.
Once all the leaves are attached, insert the stem in the container.
Starting at the bottom, bend the leaves away from the stem.
|
|
|
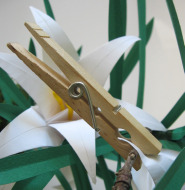
6. Glue on the flowers. We used clothespins to hold the flowers while they dried.
Happy Easter! Enjoy your origami Easter lily!
|
|
Back to top of Origami Easter Lily
Browse
the
Origami Model Library
All About
Origami Home

|
