logo for all-about-origami.com
leftimage for all-about-origami.com
 

How to Fold an
Origami Modular Unit

origami-star-4point-main.jpgThis origami modular unit is one example of the many delightful designs in the new book Crease + Fold by Sok Song.

The unit is made of six easy-to-fold pieces.  It's ideal for photos and greeting cards.

Look for photos and cards where there is an interesting image in the center.

Where the desired image is not centered, you may be able to crop it or cut it to put the subject in the center.

The free package Picnik is ideal for cropping and enhancing photos.

As with many origami modular units, the trickiest part is the assembly, particularly the last piece.  Below, I provide all the tips I discovered to make this one as easy as possible.

Unless you are a purist (no glue, no cutting), I recommend the use of glue in assembling this origami modular unit.

Materials
  • Six pieces of 4x6" or 5x7" cardstock or paper, postcards, or business cards.

    You can make regular paper more sturdy by laminating it to lightweight cardstock, which is available at print shops, or to another sheet of paper.  For how-to, click here.

  • Pencil (optional).

  • Glue stick (optional), such as UHU brand.  Quick-drying glue is not recommended because you may need to slide the pieces several minutes later.
origami-modular-song-prep.jpgTo illustrate the steps below, I used a unit that I made for my flight instructor.

I printed out two photos he would appreciate and cut up some old aviation charts for the rest.

To make a sturdy unit, I laminated the pieces to lightweight cardstock.

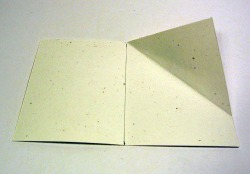
1.  Start with the image side down.


Mark the center of the long side with a pencil.


Note: The designer recommends folding the paper in half and making two little pinch creases instead.  I found this could ruin the display surface, especially when working with thick paper.

origami-modular-song-01.jpg

2.     Fold all four corners to the center line, folding and unfolding each one in turn.

origami-modular-song-02.jpg

3.     Turn the paper over and orient as shown.


You are going to fold up both ends through the point formed by the creases.

origami-modular-song-03.jpg

4.     Fold both ends exactly through the point of the X formed by the creases.


Be sure to keep the edges even (the edges that are under my thumbs).

origami-modular-song-04.jpg

5.     Turn the paper over and pop up the ends so that the square is flat on the table.


origami-modular-song-05.jpg

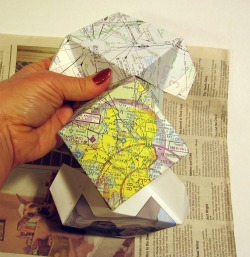
6.     Using the existing creases, collapse each end as shown.


origami-modular-song-06.jpg

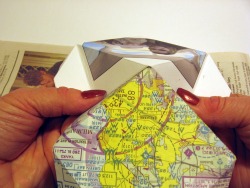
7.     Crease well.  If working with thick paper, use a tool or back of a spoon.


Make the other five units.


origami-modular-song-07.jpg

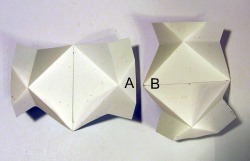
8.    The unit is assembled by laying (or sliding) Triangle A on top of Corner B.


If you do not want to use glue, skip Step 9.


origami-modular-song-08a.jpg

9.  Unfold and turn all six pieces right side up.


Apply glue to one of the rectangular flaps you folded in Step 4.  Be sure you are applying glue to the image side.  Coat the entire rectangle with glue.


Tip:  Put a piece of newspaper under the paper to allow you to apply glue all the way to the edges, while protecting your table.


origami-modular-song-08.jpg

10.  Lay an unglued piece on top of the glued flap so that the corners of two squares meet.


Slide the edges of the top piece to the creases on the lower piece.


Hold this briefly to allow the glue to set.


origami-modular-song-09.jpg

11.  Apply glue to the opposite flap so that you can join three pieces in a row.


origami-modular-song-09.jpg

12.  Join a fourth piece to the side of the center piece.


Add a fifth piece on the opposite side of the center piece.


origami-modular-song-11.jpg

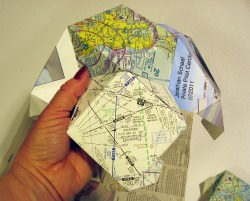
13.  With five pieces joined, it should look like this.


Look inside the unit.


You should see four neat little corners.  Make any needed tweaks before adding the last piece.


Note: I recommend not using glue on the final piece.


origami-modular-song-13.jpg

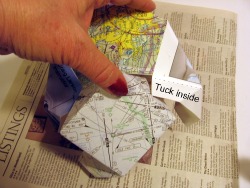
14.  The key to finishing the unit is getting all the rectangular flaps tucked inside.


I find that inserting the last piece feels sort of like a "weaving" process:
Work around the piece, putting rectangles in and edges out.


origami-modular-song-12.jpg

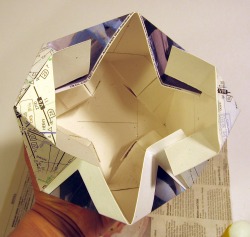
15.  Eventually, everything will lock into place.  Don't give up! Patience may be needed!


For more ideas based on greeting cards and this origami modular unit, click here.


origami-modular-song-14.jpg

Back to top of Origami Modular Unit

 Browse the Origami Model Library

All About Origami Home

footer for origami page