logo for all-about-origami.com
leftimage for all-about-origami.com
 

How to Make an Origami
Shamrock & Headband

origami-shamrock-headband.jpg

This origami shamrock headband is a great St. Patrick's Day project for a child and adult to do together.

By the way, in reality, the Irish shamrock only has three leaves, so this is technically a four-leaf clover.  It's your lucky day!

Sarah made and decorated the origami shamrock while her Grandma Boxster prepared the fabric strip.

Together, they wrapped the band.  Sarah was thrilled with her new treasure.
origami-4-leaf-clovers in display stands
This shamrock can also be displayed in a display stand. (That's a piece of Celtic-design origami paper on the orange stand.)

Or, wear it as a pin:  Attach a large safety pin horizontally on the inside of your garment.  Then slip the shamrock's stem behind the wire.

Tip:  To get ideas for decorating your shamrock, take a look at these pictures of real four-leaf clovers.  You'll also learn what each of the leaves symbolizes and other interesting facts.

Materials 
  • Embellishments for the shamrock, such as glitter glue, sequins, and jewels

  • 1 yard of St. Patrick's Day print fabric (or less if you don't mind piecing a bias strip)
  • A wide plastic headband
  • Quick-dry adhesive
  • Fabric scissors, iron, and yardstick

  • Pencil or fabric marker

Task 
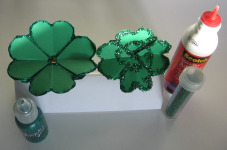
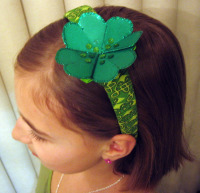
1:  Decorate the shamrock.


1.      Allow the decorations to dry thoroughly.  A display stand is ideal as a drying rack.


We used glitter glue and a jewel on one, and glue with loose gltter on the other.

origami-shamrock-decorating.jpg

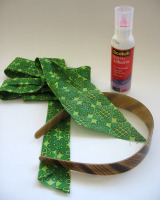
Task 2:  Cut a bias strip of fabric.


2.  Fold the fabric in half corner-to-corner.  This important because you want the strip to be stretchy.


3.  Using an iron, lightly press the folded edge.


4.  Mark a line about 1½ inches in from the folded edge.  (Based on the pattern on your fabric, you might want to adjust the width of your strip.)


5.  Cut along the line.


6.  Unfold it, then fold in the edges of the strip to meet in the middle and press with an iron.


origami-shamrock-headband01.jpg

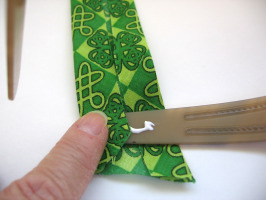
     Task 3:  Wrap the headband.


When your shamrock is dry, you're ready to wrap the headband.


7.  Apply adhesive to one tip of the headband.


8.  Insert the tip of the headband under one edge of the fabric, leaving extra fabric to fold over.

origami-shamrock-headband02.jpg

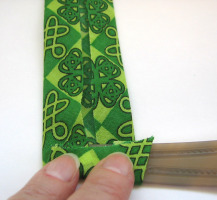
9.  Glue down the end of the fabric.  Hold, allowing it to dry a minute or two.


origami-shamrock-headband03.jpg

10.  Begin wrapping the head band, stretching the fabric tight.  Overlap each section about halfway over the previous section.


11. Continue wrapping past the midpoint of the headband.

origami-shamrock-headband04.jpg

12. When you reach the place where you want to place the shamrock, wrap the fabric tightly over the stem.


13. Finish the other tip of the headband like the first.

origami-shamrock-headband.jpg

Back to top of Origami Shamrock

 Browse the Origami Model Library

All About Origami Home