| |
How
to Fold an
Origami
Tulip
 We
found this easy origami tulip in Super
Simple Origami by Irmgard
Kneissler. We
found this easy origami tulip in Super
Simple Origami by Irmgard
Kneissler.
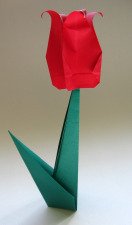
 < This arrangement is an example of "pure
origami" - no cutting or gluing, and it's entirely free-standing. < This arrangement is an example of "pure
origami" - no cutting or gluing, and it's entirely free-standing.
In this second example, we added a yellow center made of ear swabs,
and some forget-me-not flowers and leaves, and attached it all securely to a cardboard base. >
Materials
- 1 sheet of square paper for the origami tulip.
- 1 sheet of square paper for the leaf and stem.
Tip: To get the
right proportions, the leaf piece should be larger than the flower
piece. We used a 6-inch piece for the flower and an 8-inch piece
for the leaf and stem. See cutting tips.
For the yellow center:
- 3 ear swabs.
- Yellow paint. We used Dye-na-Flow Sun
Yellow. This required drying overnight. If you want to do
this first, skip to Step 11.
- Quick-dry adhesive.
|
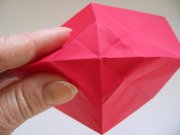
1.
Begin with a crane base.
Orient as shown (wings down).
|

|
|
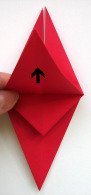
2. Fold the top flap up on the existing crease.
| 
|
|
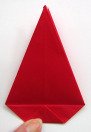
3. Turn the model over and repeat.
|

|
|
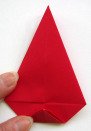
4. Fold the lower tip up to the crease line. Crease well and unfold.
|
 |
|
5. Turn the model over. Fold the tip up again on this side.
|
|
|
6. Now we are going to do an advanced fold called a sink fold.
Partially unfold the model so you can see the square-shaped crease pattern you made by folding the tip.
|
 |
|
7. You want to push (sink) the tip up into the model.
Be patient and use the existing creases.
We find that alternatingly pushing in and squeezing on the outside will eventually do the trick.
|

  |
|
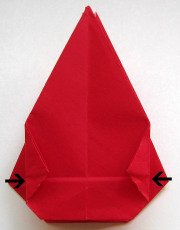
8. Fold the side corners in a little.
| 
|
|
9. Turn the model over and repeat.
| 
|
|
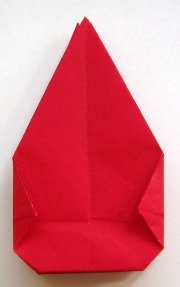
10. Curl the four petals.
Use something really slender, like a chopstick.
|  
|
|
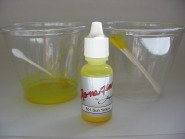
11. To make the yellow centers, put some paint in a cup and
dip the swab ends.
The paint we used required drying overnight.
When the swabs are dry, cut the swabs to the length you want (if necessary). Glue into the flower.
| 
|
|
Go to Leaf instructions.
Go
to Forget-Me-Not instructions.
Enjoy your beautiful origami tulip!
|
|
Back to top of Origami Tulip
Browse
the
Origami Model Library
All About
Origami Home

|
